
A metal roof can last 40 to 70 years, but one bad storm can still leave dents, leaks, loose fasteners, or torn flashing. So our main takeaway is simple: stay off the roof, check from the ground and inside, take photos right away, and get the right repair before small damage turns into a leak.
| Quick Summary | What to Do |
|---|---|
| First step | Stay safe and keep off wet metal |
| What to check | Gutters, flashing, fasteners, attic, ceilings |
| Main risk | Cosmetic dents can turn into rust or leaks if the finish is cracked |
| Repair path | Small issues need spot repair, larger problem areas may need panel work, coatings, or replacement |
| Insurance tip | Save dated photos, storm details, and repair notes before filing |
If you have storm damage, we should think in this order:
- Safety first
- Leak control second
- Photos and notes third
- Repair plan next
- Insurance file after that
Not all metal roof storm damage means a full new roof. Some hail dents are only surface marks. But loose screws, split washers, damaged seams, and failed flashing can let water in fast. That is why we focus on what affects function first, not just looks.
We also want to move fast on records. Many policies set claim windows from 6 to 24 months, and repair costs can range from small fixes to $10,000+ for a full replacement. In short: check safely, document early, and match the fix to the damage.

4 Repair Options for a Leaking Metal Roof
Types of Metal Roof Storm Damage
Storm damage on a metal roof can be minor, or it can turn into a leak fast. Some issues are mostly surface-level. Others affect how the roof sheds water and stays sealed. Knowing which is which helps us decide what needs attention first.
Wind and Hail Damage: Cosmetic Dents vs. Functional Problems
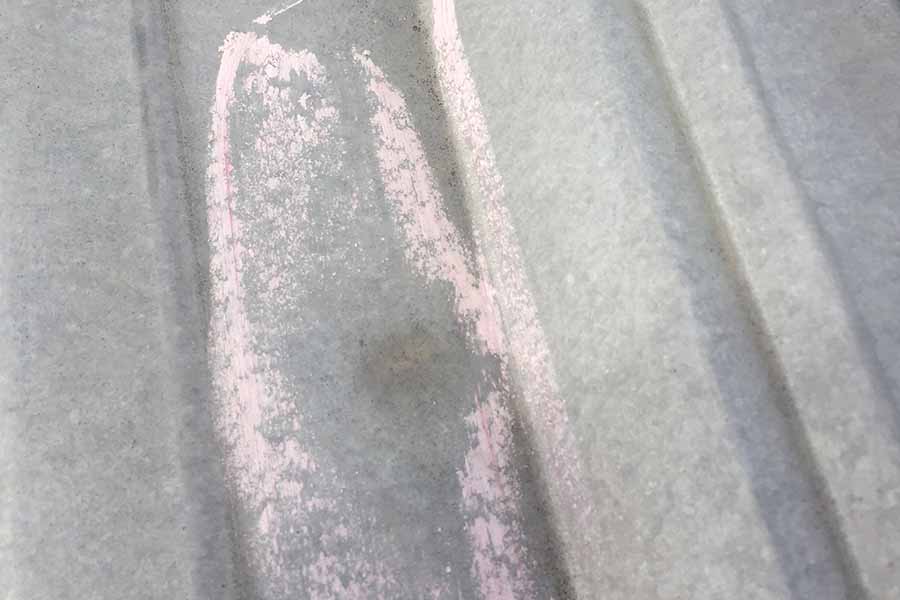
Wind and hail are two of the most common causes of metal roof storm damage. Hail can leave dimples on panels, vents, and flashing. If the dent is shallow and the coating is still intact, the damage is usually cosmetic. It may not look great, but it may not affect how the roof performs.
That changes if the strike cracks the protective finish. At that point, the damage becomes functional. Even a small crack can open the door to rust. Hail as small as 1 inch in diameter, about the size of a quarter, can cause functional damage to roofing materials.
Wind can create a different set of problems. On exposed-fastener roofs, it can tilt screws or pull them back out. Older neoprene washers can split over time, and that weak spot can let water through. Even one loose thread can let water in.
Standing seam roofs tend to take stress at the clips and seams. Under pressure, those spots can spread or lift. And it does not take extreme wind for trouble to start. Wind as low as 45 MPH can cause minor structural damage and branch impact.
A simple way to read the scene is to start with softer materials nearby. Check:
- Gutters
- AC condenser fins
- Window screens
If those are dented, there is a good chance the roof took a hit too.
Leaks, Flashing Failures, and Debris Impact: Common Problem Areas
Dents are only part of the story. Storms also push water into the roof’s weakest joints, and that is often where the bigger repair bill starts.
Flashing is one of the first places to fail. After a storm, pay close attention to chimneys, skylights, pipe boots, ridge caps, wall transitions, and valley flashing. These areas already do the hard work of redirecting water. If the vertical legs of the flashing are too short, or the hems have pulled away, wind-driven rain can slip behind the metal and soak the insulation below.
The clues often show up inside before we spot them outside. Watch for ceiling stains, damp attic insulation, musty smells after rain, and tiny points of daylight around vents or chimneys. Those penetrations and seams often shape the repair scope more than the dents we can see from the yard.
The table below sums up the main damage types, where they tend to appear, and what they can lead to over time:
| Damage Type | Visual Signs | Common Locations | Short-Term Risk | Long-Term Risk |
|---|---|---|---|---|
| Wind | Lifted seams, tilted fasteners, whistling sounds | Ridge caps, eaves, corners | Leaks | Seam fatigue, panel loss |
| Hail | Dimples, cracked coating, dented vents | Panels, soft metal vents, valleys | Cosmetic loss | Rust, corrosion |
| Water Intrusion | Stains, musty odors, light leaks | Attic, penetrations, wall transitions | Mold | Structural rot |
| Impact | Punctures, deep dents, tree debris | Anywhere | Immediate leaks | Corrosion |
| Corrosion | Rust blooms, orange/brown staining, blistering paint | Cut edges, fastener heads | Coating failure | Structural thinning |
Once we have a sense of the damage type, the next move is simple: inspect from the ground and from inside the home before getting any closer.

How to Inspect a Metal Roof After a Storm
Once you know the damage types, start from the ground and inside the building. Stay there until the roof is dry and stable. Use the damage patterns above to focus on seams, fasteners, flashing, and penetrations.
A good inspection begins with the perimeter, the roofline, the attic, and a few rooms inside. In many cases, that gives us most of the information we need without stepping onto the roof.
Ground-Level and Interior Checks: Inspect Without Adding Risk
Start by walking the full perimeter of the property. Check nearby surfaces for impact clues. Fresh dents on gutters, bent AC condenser fins, or holes in window screens can point to a major impact event.
From the ground, use binoculars to scan the roofline. Look for missing ridge caps, lifted flashings, backed-out fasteners, and panel ripples. Then go inside. Check the attic with a flashlight. A musty odor after a storm, even without a visible drip, can point to moisture getting in through damaged underlayment or loose fasteners. Then scan ceilings and walls for water spots, peeling paint, or damp drywall.
The table below shows each inspection stage, what to look for, and the tools needed:
| Inspection Stage | What to Look For | Tools Needed |
|---|---|---|
| Safety Check | Wet surfaces, downed power lines, visible structural instability | Visual only |
| Perimeter | Displaced trim, dents in gutters or HVAC fins, holes in screens, hail splatter on concrete | Camera/smartphone, notepad |
| Roofline (Ground) | Missing ridge caps, lifted flashings, backed-out fasteners, panel ripples | Binoculars |
| Gutters | Fresh dents, rust flakes, heavy debris in troughs | Ladder (at eave only) |
| Attic | Musty odors, damp insulation, daylight through holes or seams | Flashlight, moisture meter |
| Interior | Water spots on ceilings, peeling paint, damp drywall | Flashlight |
If any stage shows moisture, displaced panels, or visible daylight, stop and call a professional before going any farther. Moving fast here can help limit damage inside.

How to Document Damage for Repairs and Insurance
Once you spot damage, document it in a way that helps with both repairs and insurance. Good records make the process smoother. Start with wide-angle photos of each roof slope for context. Then take medium-range photos of trouble spots. Finish with close-ups of each damage point. Place a coin next to any dent or impact mark so adjusters can judge the size at a glance.
Record the storm date in MM/DD/YYYY format, and note the wind direction if you know it. Damage often clusters on windward slopes and ridge terminations. You can also check reported hail data for your area with tools like StormerSite.com. Document damage the same day the storm passes, since insurance policies may have strict filing deadlines.
If your inspection shows moisture, displaced panels, or other collateral damage, contact a professional for roof insurance claims assistance before filing a claim. Pro-Tech Roofing offers complimentary storm damage inspections for Tulsa-area properties. Once the damage is documented, it can be matched to the proper repair.
sbb-itb-66ccccd
Metal Roof Repair Options: Matching the Fix to the Damage
Once we document the damage, the next step is simple in theory: use the smallest repair that gets the roof watertight again.
Small issues usually need spot repairs. Damage that’s limited to one area may need panel replacement or a roof coating. But when failure shows up across the system, full replacement is often the right call. The best fix depends on where the damage is, how much of the roof is affected, and whether the structure under the metal is still in good shape.
Here’s a quick way to match the repair to the damage level:
| Damage Level | Typical Signs | Recommended Response |
|---|---|---|
| Minor | Cosmetic hail dents, loose or backed-out fasteners, minor sealant cracking around penetrations | Tighten or replace fasteners, touch up finish, reseal penetrations |
| Moderate | Leaking pipe boots, damaged flashing, isolated punctures from debris, failed washers | Flashing repair, fastener replacement, patching punctures, or panel replacement or restoration coating when damage is concentrated |
| Severe | Widespread panel deformation, compromised seams, multiple active leaks, active rust on panels | Full roof replacement |

Minor to Moderate Repairs: Fasteners, Seams, Sealant, Flashing, and Small Punctures
Minor to moderate repairs usually deal with one problem area, not the whole roof. That might mean a leaking pipe boot, a handful of backed-out fasteners, or damaged flashing where the roof meets a wall or chimney.
For failed fasteners, the usual fix is to install a slightly larger, corrosion-resistant screw with a fresh washer so it grabs the deck again. For sealant repairs, remove the failed material, clean the metal well, and apply a compatible high-performance sealant. If the issue is a pipe boot, retrofit two-part boots can go in without cutting the pipe. The boot should be shaped to match the panel profile and sealed with butyl tape.
This level of repair often costs $1 to $5 per square foot, and minor hail damage repairs average about $940.
Restoration vs. Replacement: Coatings, Panel Replacement, or a New Roof
At some point, spot repairs stop being enough. When that happens, we need to look at section-wide fixes.
If the damage is spread out, but the roof deck and structure are still sound, a restoration coating is often the lower-disruption route. Elastomeric or silicone coatings form a seamless, waterproof membrane over the existing metal surface, with no full tear-off. That can add 10 to 20+ years to the roof’s service life. This option tends to fit low-slope metal roofs with widespread weathering, minor leaks, or surface oxidation across several panels.
If the damage is centered on one area or one slope, panel replacement can fix that section without changing the whole roof. Full replacement makes more sense when there are multiple active leaks on different slopes, widespread panel deformation, moisture in the decking, or the roof is already 25+ years old on an exposed-fastener system and repairs no longer make financial sense. A new roof resets the system, but the cost is much higher, often $10,000+ and more for larger or more complex roofs.
| Method | Use Case | Disruption Level | Lifespan Impact |
|---|---|---|---|
| Spot Repair | Isolated leaks, failed fasteners, or small punctures | Very Low | Extends life of specific area |
| Panel Replacement | Severe damage limited to specific sections | Moderate | Restores integrity to affected sections |
| Restoration Coating | Widespread weathering or minor leaks on a structurally sound roof | Low | Adds 10–20+ years to service life |
| Full Replacement | Systemic failure, aged material, or widespread severe damage | High | Resets lifespan to 40–70 years |
Metal Roof Services in Tulsa: How Pro-Tech Roofing Can Help
For properties in Tulsa and Northeast Oklahoma, Pro-Tech Roofing offers metal roof storm damage assessments, repairs, and restoration for both residential and commercial buildings. Pro-Tech Roofing is licensed, insured, and certified by leading roofing product manufacturers. It’s smart to keep the inspection report, photos, and estimate handy for the insurance step that comes next.
Insurance and Next Steps: Wrapping Up the Repair Process
After the repair scope is set, we need to get the insurance file in order before we contact the carrier.
Insurance Documentation: What to Keep and How to Communicate
A solid claim file makes things much smoother. Keep everything in one place:
| Document Category | What to Include |
|---|---|
| Visual Evidence | Photos of each damage point |
| Weather Records | Storm date and hail report |
| Professional Reports | Inspection notes and repair estimate |
| Financial Records | Emergency mitigation receipts and maintenance records |
These same photos and reports do double duty. They support the claim, and they also help confirm whether spot repair, panel replacement, or restoration is the right fix. Use the record to show if the loss is cosmetic, functional, or both.
One small detail can go a long way: record wind direction during the storm. It helps trace the leak path and gives adjusters more context.
When it’s time to file, send the inspection report, photos, and repair estimate together. That way, the adjuster can review the loss in one pass instead of piecing it together bit by bit.
For Tulsa and Northeast Oklahoma properties, Pro-Tech Roofing documents damage, recommends repair or replacement, and meets your adjuster on-site. That gives the insurer a cleaner record and can speed up the review.

FAQs
Can I inspect storm damage without climbing on the roof?
Yes, but only for a preliminary check. From the ground, we can walk the property perimeter and look for dents in gutters, downspouts, or metal vents. Binoculars can help us spot displaced flashing, ridge vents, or other obvious damage.
We can also check the attic for musty odors or signs of moisture. Ground-level inspections can miss subtle damage, so Pro-Tech Roofing offers free professional inspections for a more complete evaluation.
How do I know if hail damage is cosmetic or functional?
Cosmetic damage usually shows up as shallow dents. It changes how the roof looks, but it doesn’t stop the roof from shedding water. Functional damage is different. It affects how the roof works and can lead to leaks.
Pay close attention to dents around seams, flashing, vents, fasteners, and ribs. Also check for cracked or fractured paint or coating. Some problems are tough to spot from the ground, which is why Pro-Tech Roofing can help confirm whether you need a repair or a full restoration.
Should I repair or replace a storm-damaged metal roof?
It depends on how much of the roof is damaged.
Repair or restoration is often the most cost-effective choice for small, isolated issues, like loose fasteners, minor flashing leaks, or damage to a few panels.
A full replacement is usually the right move when damage affects more than 25% of the roof, there’s visible structural sagging, or the decking is compromised. A professional inspection can confirm which option makes the most sense.