Hailstorms can cause serious roof damage, often in ways that aren’t immediately visible. A quick inspection after a storm can help prevent costly repairs and insurance complications. Here’s what you need to know:

- Types of Damage: Hail can dent metal roofs, crack tiles, split wood shingles, or strip granules from asphalt shingles. Damage severity depends on hail size, wind speed, and types of roof shingles.
- Why Inspect: Hidden damage worsens over time, leading to leaks, mold, or structural issues. Insurance claims often require proof of damage within strict timelines.
- Inspection Steps:
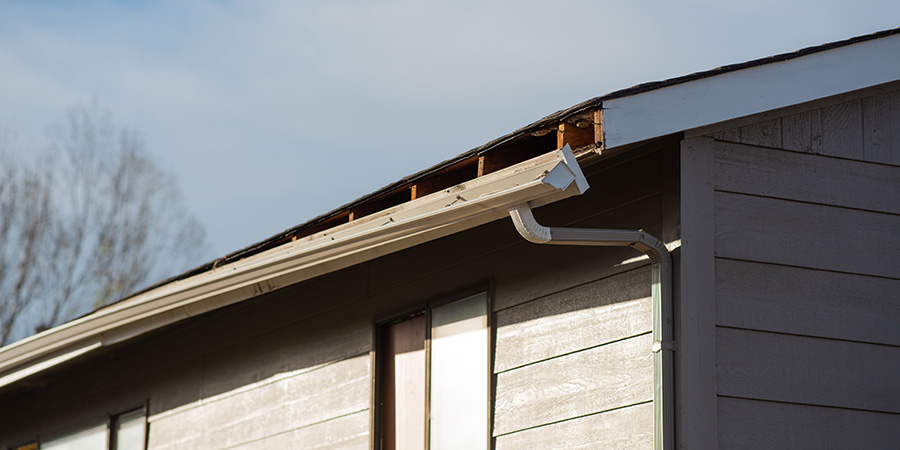
- Ground-Level: Check gutters, downspouts, siding, and soft metal components for dents, cracks, or granule loss.
- Roof Surface: Look for bruises, cracks, or granule loss on asphalt shingles; dents on metal roofs; and cracks or chips on tiles or wood shingles.
- High-Risk Areas: Inspect ridge caps, vents, skylights, and chimney flashing for damage.
- Interior: Check the attic and ceilings for water stains, leaks, or mold.
- Documentation: Take clear photos of damage and keep a storm log with dates, hail size, and weather details.
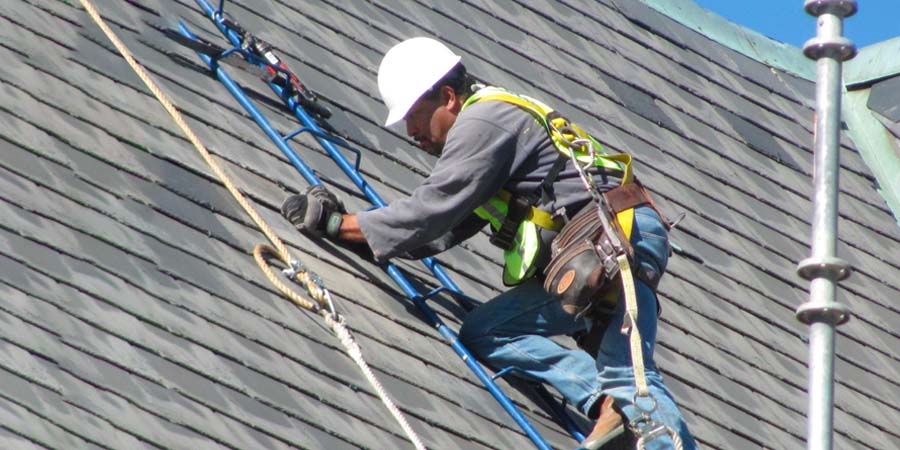
- Next Steps: Hire a roofing professional for a detailed inspection before filing an insurance claim.
Tip: Address damage promptly to avoid worsening issues. Schedule inspections after any hailstorm with stones 1 inch or larger.
This checklist ensures you catch damage early, meet insurance requirements, and protect your roof’s lifespan.
How to Inspect a Roof for Hail Damage
If you suspect your home has been hit, professional hail damage roofing services can help identify issues that aren’t visible from the ground.
sbb-itb-66ccccd
Ground-Level Inspection: Checking for Damage from the Ground
Start with a ground-level inspection to spot potential hail damage and determine if a professional roof inspection is necessary. This safer method can uncover visible signs that often hint at more extensive issues on the roof itself. Begin by examining gutters, downspouts, and siding for any telltale damage.
Check Gutters, Downspouts, and Siding
Gutters and downspouts are some of the easiest places to detect hail impact. Look for dings, dents, and dimples on metal gutters and downspouts – these marks often indicate potential roof damage. Pay close attention to areas where downspouts empty onto splash blocks or the ground. If you notice piles of black shingle granules in these spots, it’s a strong sign that hail has stripped them off your roof.
Next, inspect the siding. Aluminum siding typically shows dents and dings, while vinyl siding may crack, chip, or develop crescent-shaped breaks. You might also spot "splatter marks", which are clean areas where hail has removed dirt, oxidation, or algae. These marks can reveal both the direction and strength of the storm. To make small dents more visible, try soaking aluminum siding with water before taking photos.
Don’t forget to check for secondary signs of damage, like shredded plants, torn window screens, or cracked glass. These often accompany severe roof damage, especially when hailstones are larger than 3/4 inch in diameter.
Look at Soft Metal Components
Soft metal components are excellent indicators of hail damage because they dent more easily than roofing materials. Examine items like mailboxes, AC units, dryer vents, wall vents, and garage doors for any depressions or pockmarks. The thin metal fins on outdoor AC units are particularly telling, as they often show distinct dent patterns from hail strikes.

For subtle damage that’s hard to see, try using a chalk test on metal surfaces. Chalk will skip over indentations, making them easier to identify. Another trick is to inspect metal surfaces during early morning or late evening, when low-angle sunlight highlights dimples and dents more effectively.
Use binoculars to safely examine higher metal components, such as ridge vents and chimney flashing, without needing to climb. If these areas show damage, there’s a strong chance your roof has been affected as well. These ground-level observations provide a solid starting point before moving on to a closer inspection of the roof itself.
Roof Surface Inspection: Finding Damage on Different Materials
After completing your ground-level inspection, it’s time to take a closer look at the roof itself. For safety, consider using binoculars or hiring a professional. Keep in mind that different roofing materials show hail damage in unique ways, so knowing what to look for on your roof type is key. Here’s how to spot damage based on the material.
Asphalt Shingles: Signs of Hail Damage
Asphalt shingles are the most popular roofing material in the U.S., and hail damage here often appears as soft spots or "bruises" that feel like pressing on a bruised apple. These spots can compromise the shingle’s ability to shed water. Look for granule loss, where the protective mineral layer has been knocked off, exposing the black asphalt or even the shiny fiberglass mat beneath.
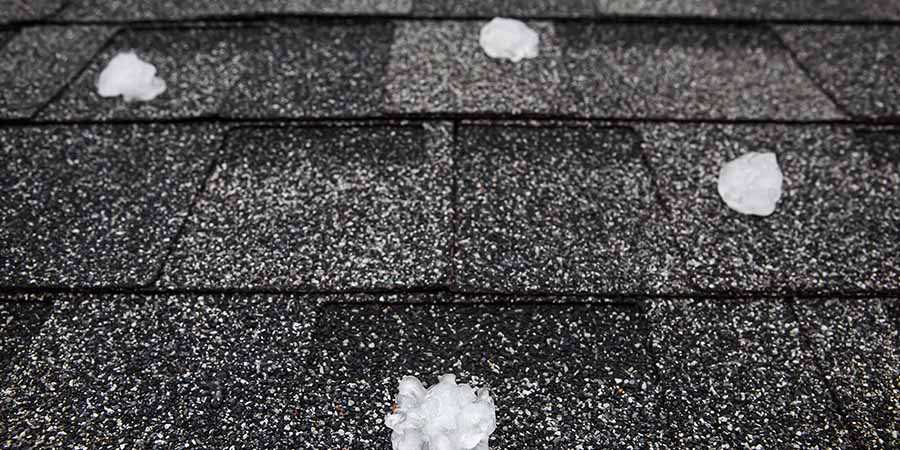
Other signs include circular or half-circle cracks caused by larger hailstones. The hail size needed to cause damage depends on the shingle type – standard 3-tab shingles typically require hailstones of at least 1¼ inches in diameter, while thicker, 30-year laminated shingles can handle up to 1½ inches before showing damage. Older shingles, which are more brittle, are especially prone to cracking and granule loss compared to newer, more flexible ones.
"Hail damage on the roof is specified as a loss in water shedding capability, or the reduction of the long term service life of the shingle." – Pro-Tech Roofing
Pay close attention to the self-seal strips along the shingles. Hail and high winds can weaken these adhesive areas, making shingles more likely to blow off in future storms. If you notice granules collecting in your gutters – resembling coffee grounds – it’s a clear sign of significant shingle damage.
Metal Roofs: Finding Dents and Paint Damage
Metal roofs typically show hail damage as visible dimples or pockmarks on flat panels. These are easiest to spot during early morning or late evening when angled sunlight casts shadows. For harder-to-see dents, try using chalk – it skips over indentations, making them stand out.
Check the paint and coating along ridges and edges for micro-cracks, chips, or scuffs, as these can lead to rust and corrosion over time. Also, inspect exposed-fastener systems for signs of impact, such as backed-out screws or deformed washers.

Pay extra attention to soft metal components like vents, chimney covers, and flashing, as they often show more pronounced dents or punctures than the main panels. Be sure to differentiate between cosmetic damage (small dents that don’t affect functionality) and functional damage (issues like deformed seams or coating loss), as insurance coverage often depends on whether the damage impacts the roof’s performance.
Specialty Materials: Slate, Tile, and Wood Shingles
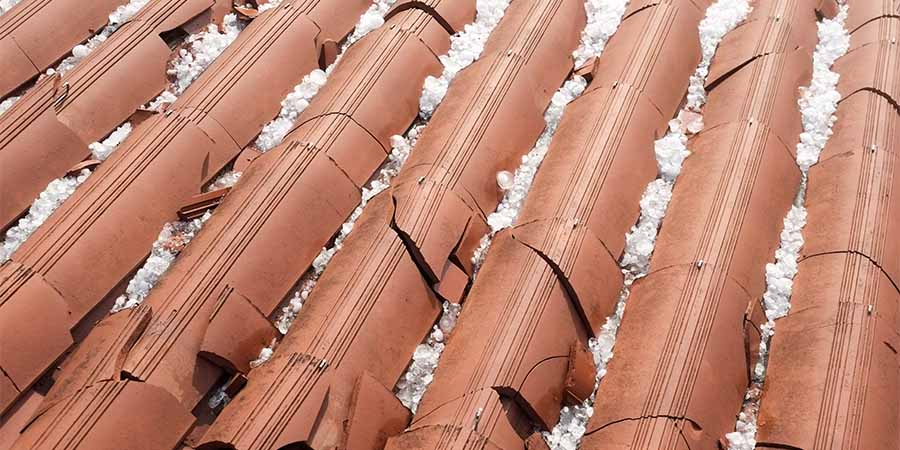
Slate and tile roofs reveal hail damage through crescent-shaped chips along the edges, hairline cracks on the surface, or clean breaks resembling shattered pottery. You may also notice spalling, where the outer glaze flakes or pits, or tiles that have shifted, slid, or fallen off entirely, exposing the underlayment. S-shaped concrete tiles are tougher, usually requiring hailstones of 2 inches to cause damage, compared to just 1¼ inches for flat concrete tiles. Avoid walking on these roofs to prevent further damage.
Wood shingles and shakes show hail damage as splits along the grain with sharp, fresh edges that reveal orange or brown wood. If the split looks weathered or gray, it’s likely pre-existing damage rather than hail-related. Look for splintering, deep cracks, and small indentations or "bruises" that weaken the material over time. Cedar shingles usually sustain damage from hailstones 1¼ inches or larger, while thicker cedar shakes can handle up to 1½ inches.
Inspecting these materials carefully can help you identify damage early and take action before it worsens.
Inspecting High-Risk Roof Features
Some areas of a roof take the brunt of hail damage. Features like ridge caps, hips, vents, skylights, and chimneys are especially at risk. This is often due to their materials – such as aluminum or thin steel – or their exposed angles, which make them prime targets for hail impacts. Carefully inspecting these areas can help you detect issues early, potentially saving you from costly water damage down the line.
Once you’ve assessed the general roof surface, shift your attention to these vulnerable features that are more likely to show signs of hail damage.
Ridge Caps, Hips, and Roof Penetrations
Ridge caps and hips, located at the highest points of the roof, are common impact zones for hail. Keep an eye out for missing shingle tabs, displaced granules, or dark, spongy spots. These signs can indicate compromised shingles, which may struggle to shed water effectively and could fail prematurely.
Roof penetrations, such as vents, plumbing stacks, and other fixtures, also require close examination. Metal vents – usually made from aluminum or galvanized steel – may show dents or dings, while plastic vents are prone to cracks or holes. A simple chalk test can help identify subtle dents on metal components; the chalk skips over the indentations, making them easier to spot.
Don’t forget to inspect the flashing around roof penetrations. Look for bent or detached edges, as damaged flashing can let water seep in. Plumbing vents should also be checked for cracks, dents, or chips. If climbing onto the roof feels unsafe, use binoculars for a ground-level inspection or hire Tulsa’s premier roofing experts. Many signs of damage are visible without needing to step foot on the roof. Always prioritize safety and wear proper gear if you decide to inspect the roof yourself.
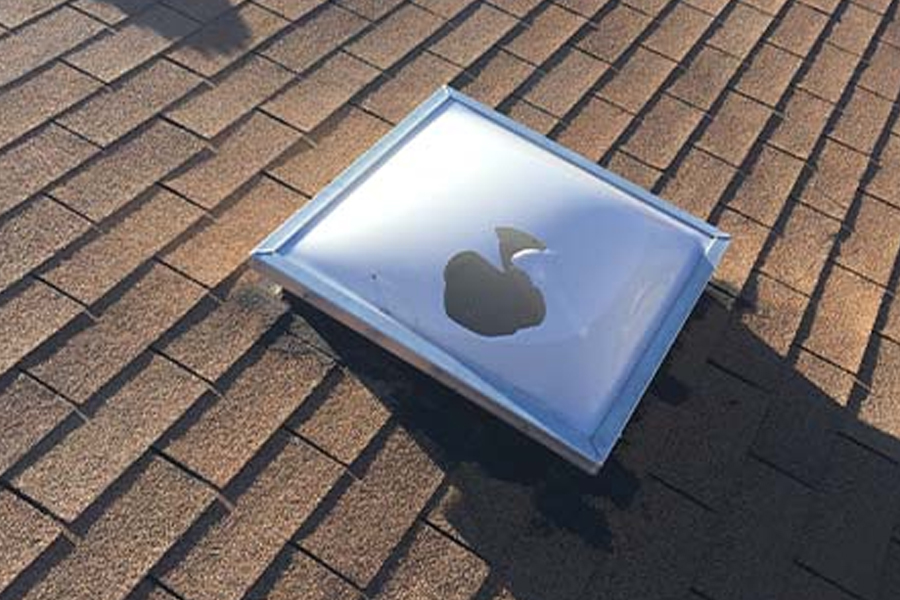
Skylights and Chimney Flashing
Skylights are especially fragile due to their glass or acrylic construction, making them susceptible to cracking or even shattering under hail impact. Even minor cracks can weaken the skylight’s structure and lead to leaks. Carefully examine the frames, surrounding flashing, and caulking for any tears, dents, or impact marks that could compromise the seal.
Chimney flashing is another area prone to damage. Check for dents or dings on metal chimney covers, and inspect the flashing for cracks, bends, or detachment. Pay extra attention to the upslope and back of the chimney, as these areas often collect debris and are more vulnerable to water penetration. Even small indentations in metal flashing can indicate underlying issues that might worsen over time.
"Flashing helps to prevent water from leaking into your roof, chimneys, vents, and any other roof penetrations… This type of damage can be a cheap fix or an expensive oversight."
Document any damage you find, especially on metal fixtures and skylights, by taking clear photographs. These images can support your insurance claim. Many insurance companies require evidence of at least eight hailstone impacts within a 10-foot by 10-foot section across three different roof locations to approve a full replacement.
Interior Inspection: Linking Exterior Damage to Interior Problems
Once you’ve finished inspecting your roof and the exterior of your home, it’s time to turn your attention indoors. Hailstorms can create hidden "micro-leaks" that may not be immediately obvious but can lead to serious issues like wood rot, mold, and structural damage over time. Acting quickly to inspect your interior after a hailstorm can help you catch leaks early, preventing more severe problems like weakened insulation or even electrical hazards.
Check the Attic for Water Intrusion
Start with the attic, as it’s often the first place where water intrusion becomes visible. Look for telltale signs such as sunlight streaming through the roof decking, dark stains, streaks, or rings on the rafters, and insulation that appears damp or compressed. A musty odor after rainfall can also be a red flag for hidden leaks. Pay close attention to areas around chimneys and light fixtures, as these are common points of vulnerability. If you’re unsure, consider using infrared imaging to detect moisture that’s not visible to the naked eye.
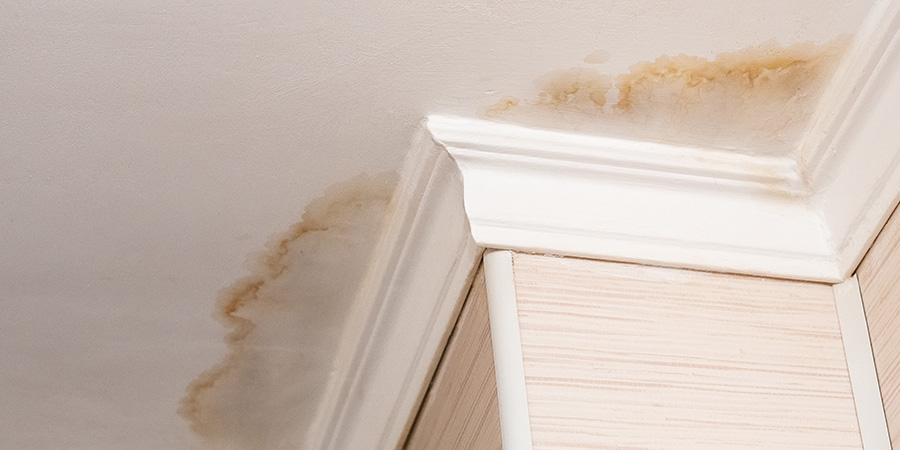
Inspect Ceilings and Walls for Moisture Damage
Take a close look at your ceilings and walls for any signs of water damage. This includes water stains, discoloration, peeling, or bubbling paint – especially near recessed lighting or in corners. Keep in mind that water can travel along rafters, so the source of a stain may not be directly above the visible damage.
"While your home’s roof might appear undamaged on the exterior, wind and hail can cause unseen leaks that may lead to bigger problems later."
Don’t forget to check less obvious areas like closets and the garage, as these spaces can also reveal early signs of leakage. If you spot mold or mildew on any interior surface, it’s a sign of a long-term leak that needs immediate professional attention. Make sure to document all your findings to accompany your roof inspection records, as this information will be invaluable if repairs are necessary.
Documenting Damage and Planning Your Next Steps
Once your inspection is complete, the next step is to document the damage and figure out your plan of action.
How to Photograph and Record Damage
Start by taking photos of the damage as soon as possible to establish a clear timeline for your insurance claim. Be thorough – capture wide shots, medium-range angles, and close-ups of the affected areas. For close-ups, include a scale, like a ruler, to show the size of each impact.
For metal surfaces, you can use carpenter’s chalk to make small dents more visible. If you’re dealing with aluminum siding, wetting the surface can help highlight impact marks. To keep everything organized, label your files with a clear naming system, such as "2025-09-22_WestSlope_Bruise_01.jpg." This makes it easier for insurance adjusters to review your evidence. Additionally, maintain a storm log that records key details like the date and time of the storm, hail size, wind direction, and any weather alerts you received.
When to Call a Roofing Professional
Before filing an insurance claim, reach out to a roofing professional for a free hail damage inspection and a detailed, photo-rich impact report. Many insurance companies require proof of at least eight hailstone impacts within a 10-foot by 10-foot area across three different locations to approve a full roof replacement.
"Do not call your insurance company and file a claim yet. Contact a professional, local roofing company and ask for a hail damage roof inspection."
- Pro-Tech Roofing
Schedule this inspection quickly to avoid further issues. Professionals, such as Pro-Tech Roofing (licensed by the State of Oklahoma Construction Industries Board #80000220), can identify the difference between "functional damage", which affects your roof’s ability to shed water, and "cosmetic damage", which impacts appearance only. This distinction matters since insurance policies typically cover functional damage but exclude cosmetic issues.
Understanding Insurance Claim Timelines
Once you’ve documented and assessed the damage, organize your materials to strengthen your claim. Many policies require claims to be submitted within one year of the damage occurring. Check your policy to confirm your deadline and whether your coverage is Actual Cash Value (ACV) – which pays the current depreciated value – or Replacement Cost Value (RCV), which covers the full replacement cost (though depreciation may be withheld until repairs are completed).

Keep receipts for any emergency repairs, such as tarping to prevent leaks, as these costs are often reimbursable. Compile all your documentation – photos, storm logs, contractor reports, and repair estimates – before contacting your insurer. If you notice neighbors getting roof replacements or see contractor signs in your area, this can serve as additional evidence of storm damage to support your claim.
Conclusion: Protect Your Roof with Regular Inspections
Hail damage might not always be obvious, but even minor issues like bruising, granule loss, or tiny fractures can lead to expensive problems – think leaks, mold growth, or rotting wood. In 2022 alone, hail-related claims surged by $1 billion, with more than 4,400 severe hail reports across the country. These numbers make one thing clear: early detection is key.
"A roof inspection can save you thousands in damage caused by roof leaks."
- Pro-Tech Roofing
To stay ahead of potential damage, schedule a professional roof inspection after any hailstorm featuring stones 1 inch or larger. Additionally, an annual check-up can help spot issues like curling shingles, loose seams, or flashing concerns before they escalate. Don’t forget to trim nearby tree branches – they can cause granule loss or hide damage that might otherwise go unnoticed.
Protecting your home starts with prompt action. If you’re in the Tulsa area, Pro-Tech Roofing offers free inspections to help you identify problems early. Licensed by the State of Oklahoma Construction Industries Board (Residential License #80000220), they provide detailed, photo-documented reports that clearly separate functional damage from cosmetic issues. Reach out to Pro-Tech Roofing today and prevent small problems from turning into costly repairs.
FAQs
What are the signs of hail damage on different types of roofs?
Hail damage can look different depending on the roofing material, but there are some telltale signs to watch for. Asphalt shingles might show dark spots, missing granules, or visible cracks. With wood shingles, you could notice splits, chips, or uneven cracks. Metal roofs often reveal dents or dimples, while clay or slate tiles may have cracks or chipped edges. On flat roofs, keep an eye out for displaced gravel, cracks, or even punctures.
If you spot any of these issues, it’s a good idea to schedule a professional inspection. Pro-Tech Roofing specializes in hail damage assessments and can help you figure out the best steps for repair.
What should I document for a roof insurance claim after hail damage?
After a hailstorm, it’s important to take steps that make the insurance claim process as smooth as possible. Start by documenting the storm date and snapping clear, dated photos of any visible damage. Pay close attention to areas like gutters that look dented or dimpled, damaged metal trim, splatter marks on driveways or sidewalks, missing or cracked shingles, and dents on metal roofing. Don’t overlook spots like roof vents, skylights, or any interior signs of water damage, such as stains or leaks.
It’s also helpful to keep a written record of the hail size. For added accuracy, consider getting a professional inspection report. Companies like Pro-Tech Roofing can provide detailed inspections, ensuring you have all the necessary documentation for your claim.
When should I call a roofing professional to inspect for hail damage?
If you spot signs of hail damage like dented gutters, cracked shingles, missing granules, or damaged metal trim, it’s time to reach out to a roofing professional. Even if you’re unsure about the damage or lack the tools and expertise to safely check your roof, calling an expert is the smart move.
Acting quickly after a hailstorm is essential. Prompt inspections can help prevent more extensive issues and ensure repairs are handled before they turn into bigger problems.