When filing a roof damage insurance claim, detailed photos are your absolute best ally. Insurers rely on clear, timestamped images to verify the extent, timing, and cause of damage. Providing thorough documentation reduces disputes and speeds up your claim process.
Note: This post was originally published in Dec 2025 and has been fully updated in 2026. Here is exactly what you need to know to document your roof properly.

- Wide-Angle Shots: We recommend capturing your roof from multiple angles from the ground. This shows the overall context of the damage to your entire property.
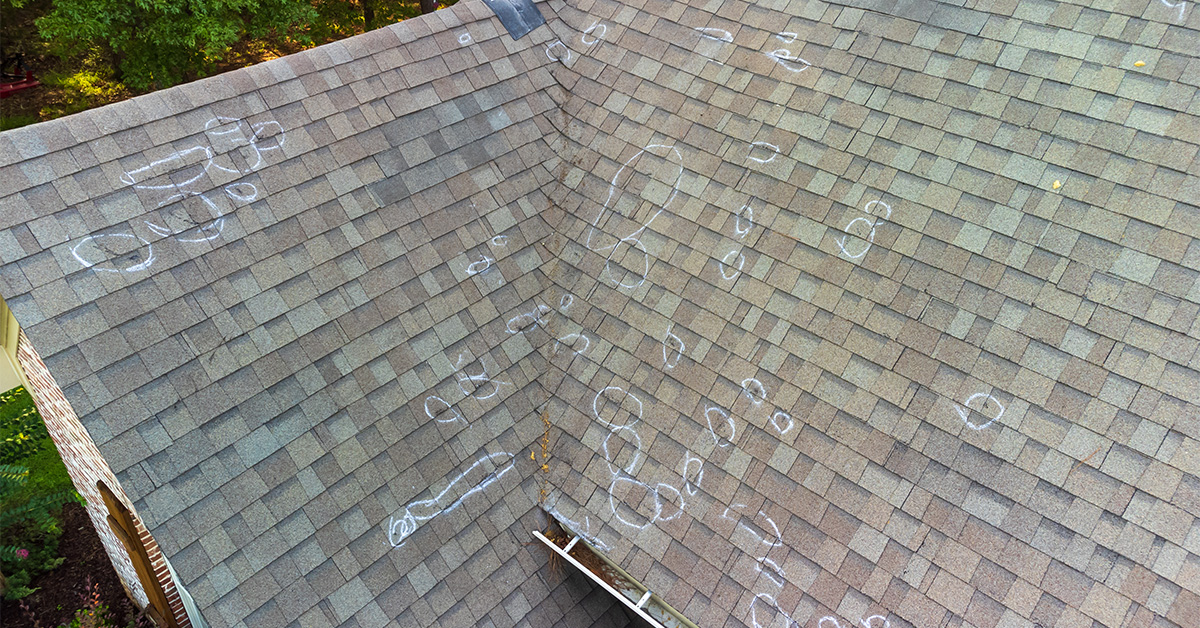
- Close-Ups: You must zoom in on specific issues. Look for missing shingles, dents in soft metals, cracks, or bruising.
- Roof Features: Document damage to all components. This includes gutters, vents, flashing, and fascia, as these are often impacted first.
- Interior Issues: We always link roof leaks to indoor problems. Include photos of water stains, peeling paint, sagging drywall, or attic damage.
- Before-and-After Photos: Use date-stamped images to prove the damage happened during a specific event. This is crucial 2026 documentation.
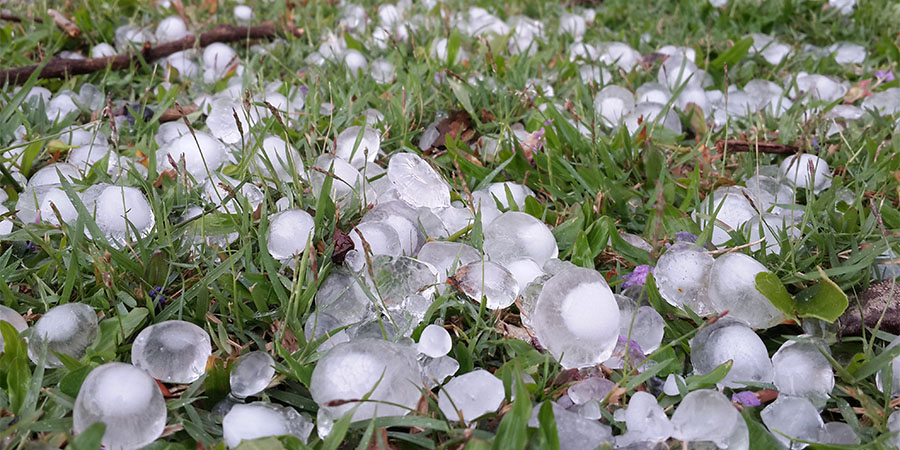
- Weather Evidence: If possible, snap photos of hailstones, fallen debris, or other storm signs. Connect the damage directly to recent weather.
- Key Takeaway: We prioritize safety. For your safety, avoid climbing damaged roofs. We use optical zoom from the ground or hire professionals. Organize your photos logically and back them up to the cloud immediately.
How to Inspect Roofs Safely Using Drone Photos and Adjuster Technology
How do we get great photos without risking a fall? Technology is the answer in 2026. Using drone photos or high-powered optical zoom allows for thorough, safe inspections. We often utilize these methods to provide the detailed evidence insurers demand while keeping everyone on the ground.
Why Insurance Companies Absolutely Require Roof Damage Photos
Photos play a absolutely crucial role for insurance companies in 2026. They use them for assessing property damage and determining appropriate compensation. Photos provide undeniable, objective proof of the extent and timing of losses. This helps adjusters connect the damage to a specific weather event. This is a primary requirement outlined in most standard insurance policies. These images serve as the fundamental visual record. They show patterns of damage that clearly point to storm-related causes, rather than maintenance issues.
Additionally, detailed photos help adjusters differentiate between covered damage and non-covered items. Policies often cover sudden, unexpected events like hailstorms, high winds, or fires. However, they typically exclude damage caused by aging, neglect, or normal wear and tear. For example, photos can reveal whether shingles were torn off by strong 2026 wind gusts or if they simply wore out over time. This distinction is critical. It determines whether you receive a full payout or if your claim is denied entirely.
Proving Storm-Related Damage objectively
Photos must highlight specific storm damage to be effective. We look for hail dents, punctures, or shingles peeled away by high wind. These are essential for proving that the damage resulted from a sudden, covered event rather than gradual wear. For instance, large hailstones common in Oklahoma can hit at speeds of up to 110 miles per hour, causing extensive damage to shingles, gutters, and flashing. Timestamps on your photos are mandatory. They link the damage to a documented weather event, such as a specific hailstorm or high-wind incident, proving the damage happened during that specific window. This clear evidence supports your claim and helps you avoid unnecessary disputes.
Avoiding Commercial Insurance Claim Disputes
Dated and detailed photos significantly reduce the likelihood of disagreements. They offer objective, irrefutable proof of the damage. When adjusters have clear evidence of what occurred—and when—it leaves less room for debate. There is less argument over whether the damage was caused by a storm or neglect. Photos of interior damage add further credibility to your claim. Capture water stains on ceilings or damp attic insulation. These show the severity of the roof breach and its direct impact on your home’s interior. This comprehensive documentation strengthens your case and ensures a smoother, faster claims process.
Exact Types of Roof Damage Photos Insurers Need in 2026
When it comes to roof damage claims, insurance adjusters rely on specific types of photos to evaluate the situation accurately. Missing even one category can slow down your claim or reduce your payout. These images should paint a full narrative. They must show everything from the overall perspective to the smallest nuance. Here is what insurers absolutely expect to see from us.
Full Roof Overview and Perspective Photos
What is a roof overview photo? It is a wide-angle shot that captures your roof from multiple directions to provide context. We start with these shots because they offer a big-picture view of the damage. They show the roof’s condition in relation to your home. To get this right, we take pictures from the ground at each corner of your property. We always work systematically in a clockwise direction. We use landscape orientation and ensure every single section is covered.
Detailed Close-Up Photos of Specific Damage
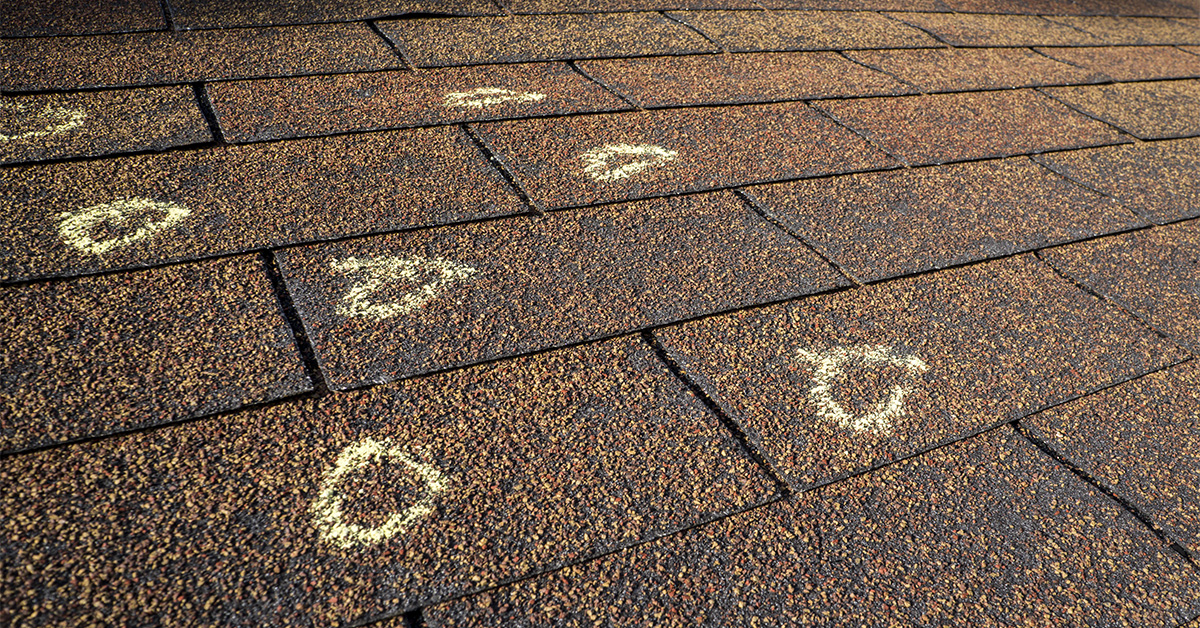
Once you’ve captured the overall view, you must zoom in on the details. Insurers need clear, high-resolution images of specific issues. We document missing shingles, cracks, dents, or holes. These close-ups help demonstrate the exact cause and the true extent of the damage. For hail damage in Tulsa, we include angled shots to highlight the depth of dents or indentations. Be extremely thorough. Document hail marks, granule loss, and any debris that contributed to the damage.

Photos of All Roof Components and Penetrations
Do not overlook the smaller components of your roof. We require documentation of features like gutters, vents, and flashing. These elements often sustain damage during storms that shingles do not show immediately. For example, gutters may show fresh dents or granule buildup. Include wide shots to show each component’s location on the roof, followed by close-ups of specific damage. Use your camera’s flash to highlight subtle damage in shadowed areas.
| Roof Component | Photo Details We Require | How This Supports Your Claim |
|---|---|---|
| Gutters & Downspouts | Dents, clogs, or detachment from the fascia. | Proves hail impact and dynamic drainage issues. |
| Vents & Stacks | Close-ups of the unit and surrounding flashing. | Identifies impact damage and potential leak points. |
| Flashing | Seals around chimneys, skylights, and valleys. | Shows displacement or critical sealant failure. |
| Eaves & Fascia | Wind-lifted sections or water stains. | Documents wind damage and moisture exposure. |
Extra Photos That Significantly Strengthen Your Claim
Adding supplementary photos can help establish a crystal-clear connection. We want to link the roof damage directly to related interior or exterior issues.
Interior Water Damage Photos
Roof leaks do not just harm shingles; they can impact your entire home and structure. We require photos of ceiling stains, sagging drywall, and peeling paint as evidence of water intrusion. Do not overlook your attic. We always look for mold, dark spots on rafters, or rust around roof nails. These signal developing problems. Also, document moisture around light fixtures, wall outlets, and air vents to show how water is spreading and causing damage. If you have had to use buckets to catch drips or tarps to protect furniture, capture these temporary fixes. They highlight the active and ongoing nature of the leak.

Take wide shots to provide context and close-ups of specific issues like bubbling paint or water-stained furniture. If personal items like electronics, carpets, or hardwood floors have been damaged, photograph them too. We use these images to demonstrate the full extent of your loss and how roof damage has led to interior problems. This kind of documentation is especially important. It ties external roof issues to interior damage, which often falls under different coverage parts of your standard homeowners insurance policy.
Critical Dated and Before-After Photos
Before-and-after photos are absolutely critical in 2026. They show definitively that damage occurred during a specific event. Without “before” images, you risk adjusters claiming the damage was pre-existing. We demand you use date-stamped photos and include an object for scale to verify when the damage happened. Make sure you document everything within 24–48 hours of a storm. This prevents small issues from being dismissed later as normal wear and tear.

Supplemental Weather Evidence Photos
We want to establish that your roof damage stems from a specific weather event, not aging. We need supplementary photos that support your claim. Snap pictures of hailstones next to an object for size comparison. We survey the yard for signs like hail piles, fallen branches, or debris patterns. Capture these before cleanup begins. We also check soft metals like gutters, downspouts, or mailboxes for fresh dings, which signal recent hail activity. Keep digital screenshots of local weather alerts, radar maps, or news articles from the day of the storm. Also, document damage to window screens, fences, or vehicles to provide additional context. These photos work alongside direct roof images to create an undeniable case for your claim.
How to Take Quality Roof Damage Photos Safely
These days, modern 2026 smartphones are more than capable of capturing clear photos of roof damage for documentation. If you are taking pictures from the ground, you must opt for optical zoom instead of digital zoom. A high-quality camera with 30x to 60x optical zoom can capture details like individual shingles or a chimney cap from as far as 40 feet away with no ladder needed. Digital zoom, on the other hand, can result in blurry, pixelated images that insurance companies often reject. We stick to optical zoom whenever possible.
Most smartphones in 2026 also have the added convenience of automatically uploading photos to cloud storage. This not only keeps your documentation safe if something happens to your phone but also makes sharing images with insurance adjusters easy. We require you to enable automatic timestamps on your camera or phone to verify when the damage occurred. For interior or attic shots, use your phone’s flash or a strong flashlight to brighten areas like ceiling stains or water damage near rafters. With these tools, we can get the necessary photos while you stay safe.
Staying Safe Is Priority One: Inspect From The Ground
We always begin with ground-level shots. Use binoculars to scan for missing shingles, debris, sagging areas, or other visible damage. Before approaching any building, check for hazards like fallen power lines, broken glass, or signs of structural instability. If you must use a ladder for context, take precautions. We secure our camera with a wrist strap, keep it in a belt case to prevent drops, and strictly avoid climbing onto steep, high, or heavily damaged roofs.
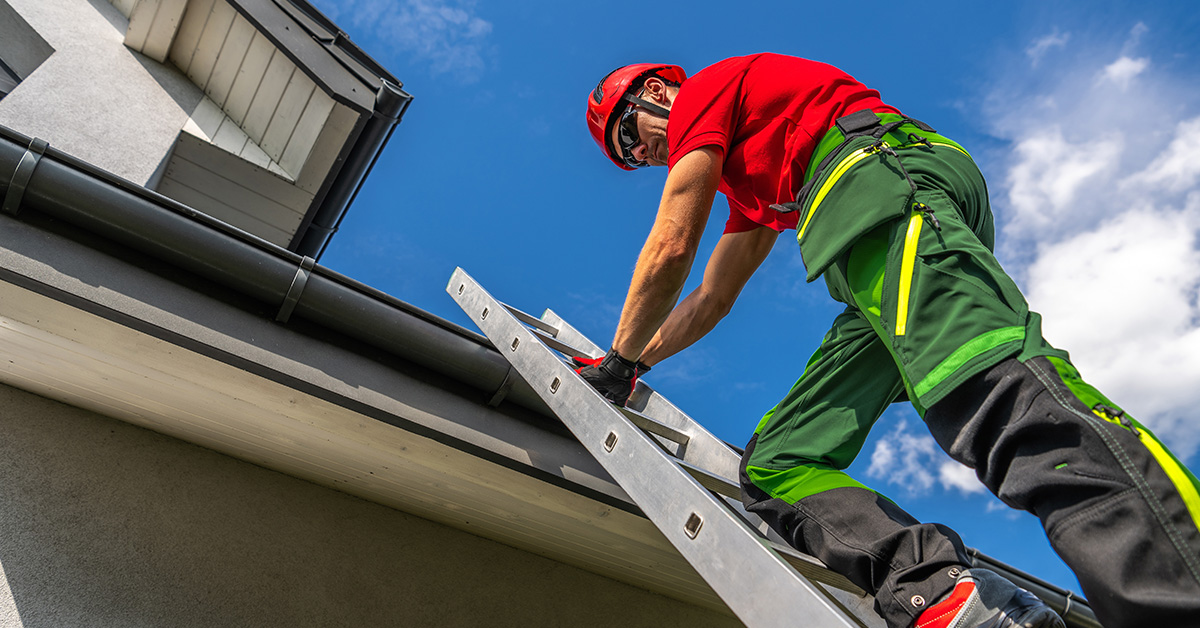
For roofs that are steep, high, or significantly damaged, you must leave the job to professionals. Companies like Pro-Tech Roofing have the specialized safety equipment and expertise to document roof damage safely. We eliminate any risk to you while ensuring your insurer gets the high-quality photos they require for claim approval.
How to Properly Label and Organize Photos for Claims
Once you have safely captured your photos, you take a moment to organize them. This is key for 2026 efficiency. Create clearly labeled digital folders for exterior, interior, and supplemental images. Include details like the date, time, and specific location in the folder names. Something like “North Slope – Hail Damage – 12/26/2025” is far more useful to us than “IMG_4523”. Work in a logical sequence. Whether it is clockwise around your property or by specific zones like the attic, rooftop, or perimeter, we ensure you do not miss anything.
Use your phone’s album feature to group storm-related photos together. This makes them easy to locate and share with your adjuster. Whenever possible, we take photos in landscape orientation. They display better in standard insurance software and inspection reports. Back up all your photos to a secure cloud service immediately. We advise you not to discard damaged items or debris until your adjuster gives the final go-ahead.
Conclusion
Key Points to Remember When Documenting
When filing a roof damage insurance claim in 2026, having detailed photo documentation is absolutely essential. Experts emphasize that photos serve as your strongest objective evidence during the entire claims process. Start with wide-angle shots to capture the context of the entire roof. Then, you must zoom in on specific problems like missing shingles, hail dents, or other visible damage. Do not forget to include interior photos. These highlight water stains on ceilings or damp insulation in the attic, showing how the roof damage has directly impacted your home.
To make the process smoother, you keep your photos organized. Group them logically and back them up to secure cloud storage. This way, we can avoid unnecessary delays or disputes with the insurer. Once your documentation is in order, we shift our focus entirely to safety.
Your personal safety must always take precedence. If your roof is steep, tall, or severely damaged, you must leave the inspection and photo-taking to professionals equipped for the job. For homeowners in Northeast Oklahoma, Pro-Tech Roofing offers professional inspections, high-resolution photo documentation, and expert guidance to streamline the entire insurance claim process. Our detailed reports ensure that all damage is properly recorded, adding vital credibility to your claim.
Most Oklahoma insurance providers allow up to one year from the storm date to file a claim. Whether you handle the documentation yourself or enlist a trusted contractor, thorough and timely preparation makes the difference. It is the difference between a quick settlement and a drawn-out dispute. Organized, clear documentation expedites the process and protects you from potential complications in 2026.
Frequently Asked Questions
What specific photos should I take for a roof damage insurance claim?
In 2026, when filing a roof damage insurance claim, having clear and detailed photo documentation makes all the difference. We start by taking wide-angle photos of your entire roof from various ground angles. These shots provide a full view and context of the damage. Then, we focus on close-up images that highlight specific issues like missing or damaged shingles, cracks, dents in soft metals, or bruising.
Do not stop at the exterior. You must include photos of interior damage as well. Water stains, active leaks, or damp insulation inside your home serve as critical evidence linking the roof breach to other covered problems.
We organize your photos thoroughly and present them clearly to strengthen your claim. This often speeds up the entire process. If you are not confident about capturing the right images safely, Pro-Tech Roofing offers professional inspection and documentation services to ensure your claim is well-supported.
How can I take photos of roof damage safely without climbing?
If you need to document roof damage but want to avoid climbing, your smartphone or a camera with strong optical zoom can do the job safely. Start by standing on stable ground—your yard or driveway works well—and take wide-angle shots of the roof from different angles. Then, you use the zoom feature to focus on specific problems like missing shingles or cracks. For critical close-up shots, we recommend placing a common item like a coin or ruler in the frame for scale.
Do not forget to inspect the inside of your home too. We snap photos of water stains, damp insulation, or any leaks in the attic that might be linked to roof issues. You always make a note of the date, time, and weather conditions. To keep things organized, we store your photos in clearly labeled digital folders for quick access.
For a thorough inspection and professional 2026 photo documentation, reaching out to Pro-Tech Roofing, a licensed and insured roofing company, is always a smart move. We provide expert assistance while ensuring your safety.
Why do insurance companies require before-and-after photos of roof damage?
Insurance companies absolutely require before-and-after photos of your roof to document its exact condition prior to any damage and after the specific incident. These photos help us confirm the true extent of the new damage and ensure it is connected directly to a covered event, rather than neglect.
Submitting clear, date-stamped, and detailed images strengthens your claim significantly. We make sure you take pictures from multiple angles and include precise close-ups of any visible damage. This ensures the insurer has every detail they need to assess your claim accurately and provide a full payout in 2026.